Wednesday, July 20, 2022

Playing with Freshly Made Sketches!

Hello! Today I am playing over on the Freshly Made Sketches challenge blog.  The sketch had rectangles, but I saw the bottles in the July Paper Pumpkin kit and *had* to use them instead.  It is a surprisingly clean card for me!  Not my usual style, but I needed to get out of my box and be simple for a change.   😁

I did have to pop up the sentiment with dimensionals.  I also used the retired High Seas 3-D embossing folder.  It makes a nice masculine card without all my usual bling.  Clicking on the badge will take you to this challenge #545.         

                                                                 Copy and paste our badge for your blog!

   Hope you enjoyed my take on the sketch!

Happy stamping, 

Becky


Thursday, February 24, 2022

GDP Challenge #331

Well hello there!  How've you been?  I am returning after a LOOOOOOONG hiatus with an entry for the Global Design Project Dots & Circles challenge- click on the blue words to go to the GDP site and check out the challenge for yourself!


The card is based on a Jenifer McGuire sample, click here to see her directions.   I used Stampin' UP! Thick Basic White for the base, die cut with circles from the Layering Circles die set.  The DSP (with the Polka Dots) is SU! Sunshine and Rainbows, and the other circles are punched from card stock with varying sizes of circle punches.  The greeting is from the set Special Moments, punched with the Banner Pick-a-Punch for the tail, adhered with dimensionals and I added two adhesive backed sequins.  The DSP and stamp set are both items you can get as a gift for Sale-a-Bration when you make a $50 purchase and there are only 5 days left!  

My card won't stand up by itself, but when you open it, it looks soooo cool! I had some extra dots, so I had to use them! 

So, how'd I do on the challenge?  😂😂

Hope you are inspired to create your own version of this shaped card!  

Happy stamping!


Saturday, August 22, 2020

Slimline & Stitched Saturday

Well howdy!  I have spent a few days cruising around the internet to find out that apparently the new trend is slimline cards.  Just who decides these things?  Is there a survey/notification that I don't get?  I haven't made one of these in YEARS.  The last one was for thank you cards for the NC Music Educators Honors Chorus clinician and accompanist- I have gone a-hunting and found the picture of that one and stuck it at the bottom of the post.  Since this is the new thing, here I have for you a slimline card!  The stitching part comes from the dies I used.  And who doesn't love three word alliteration?  The more the merrier, right?  This idea has been percolating in my head and while it was not exactly what I thought I was going to do, I rather like how it turned out.  I even got fancy with the picture taking and put in an ink pad and some bling!  Woo!  The craziness never stops! However, the crooked picture taking apparently doesn't stop either.  Sigh.  I really thought I had the camera straight.   Gotta work on my fancy picture staging, I'm sure there's an online class...or YouTube demo...

I used the Stitched Triangles dies from Stampin' UP! as well as the Artistry Blooms DSP (Desigenr Series Paper, but that takes too long to type...).  All triangles were stuck down with the new Stampin' Seal (the regular one).  The Blackberry Bliss card measures 9" long and 8" wide- scored at 4".  The Magenta Madness piece is 8-1/2" x 3-1/2" and I stamped the large triangle from the The Right Triangle stamp set in VersaMark ink.  It wasn't really essential, but I liked the look.  Since this piece is heavier, I used the Stampin' Seal Plus to stick this piece down.  I'm really liking the new Seals- hard to break the "check mark" habit from the old Fuse, but I'm getting there.  The sentiment is from the So Sentimental set and is die cut with a die from the Stitched So Sweetly dies.

I am on a You-Must-Make-The-Inside-Pretty-Too kick, so I fancied up the inside.  Plus, I had some triangles left over...Not too bad, but I probably should have done the triangle on the top AFTER I put the ribbon on.  Hindsight and all that.

There you have my newest adventure in making a slimline card.  😁  Hope it inspires you!  

Happy stamping! (or in this case, mostly die cutting) 

Oh just FYI- Stampin' UP!'s new die cut and embossing machine is GREAT!!!!!  The triangles just fall right out!  PLUS anyone have trouble getting the Stitched Rectangles to release from the die once cut? Not now! It is so much easier!  Truly, truly easier.  And this is from a dedicated Vagabond user!  The standard size machine will be available on September 1st, the mini one is still delayed due to complications from our new not-friend COVID.  

Friday, August 21, 2020

And we're back!!!

Okay, it's just me, but you know what I mean. 😄  So if you check out the profile, you will see that I have retired from the day job, which is why I can now resume my blogging life.  To start off this new chapter, I have for you a fantastic sunflower card featuring the Celebrate Sunflowers and Sunflowers die set from the new Stampin' Up! June 2020-May 2021 catalog.  I have helpfully provided a link to my Demonstrator Website where you can view the catalog(s) and conveniently shop on SU!'s new online store.  I'm just nice like that. 😂 

Directions for making this card come from Jennifer McGuire.  Click HERE to be magically transported to her blog to watch her create three split gatefold cards.  I changed her directions slightly since my background is not embossed, it's stuck on with adhesive sheet and the sunflower is not symmetrical, but I really wanted to use it, so there you have it.  After several attempts and utter failures in trying to create labels for my Stampin' Blends,  I found this idea from fellow demonstrator Julie DiMatteo.  Click on her name to whisk away for directions.  I don't have the exact same label maker she uses, but it worked very well.  

Hope you enjoyed your visit here, happy stamping!

Saturday, August 6, 2016

OCC Creative Chemistry 3

Sooo... How've you been?  Good, good, glad to hear it.  I've been, well, just not posting.  Gone so long that this typing your post page is different than the last time I was here.  :) Heh.  Ah well, I suppose I shall get used to it- then be gone again and they will have changed it all again.

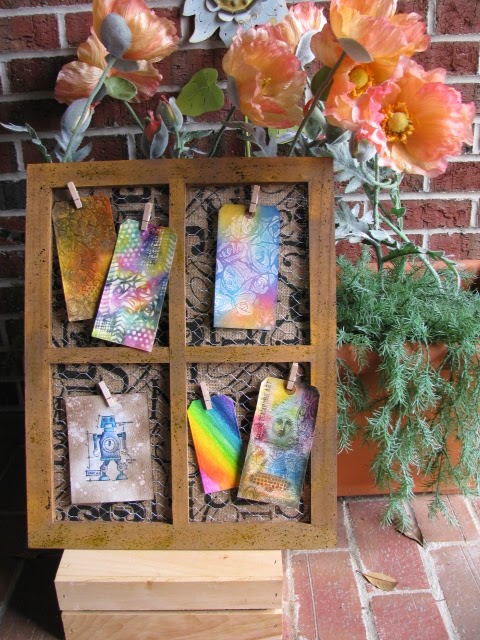
Please note that I WENT OUTSIDE (to my front porch) to take a pretty picture for your enjoyment.  And since I live in NC...it was HOT.  So even though I've been gone forever, see how much I love you guys?  :)

I am playing along over at 
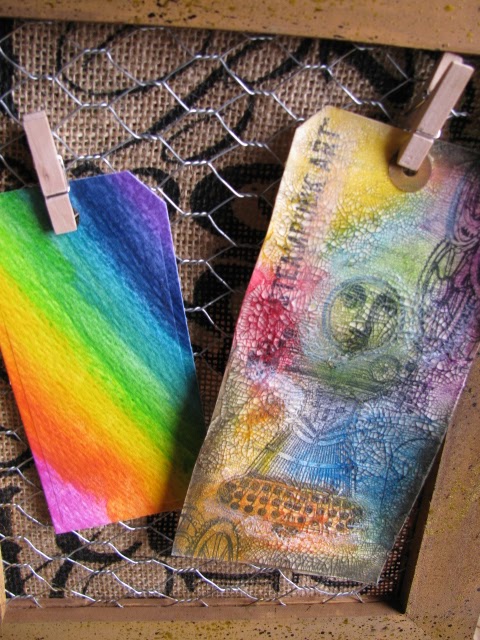
Online Card Classes (if you click the blue words it *should* take you there...that is if I did it correctly...) with Tim Holtz in the Summer of Creative Chemistry.  This is the final class in the series, Creative Chemistry 3 and it is awesome!  Here is Day 4's (okay, so it is now day 6...I'm a little behind...) collection of samples.  Today was all about playing with Distress Crayons.  And boy, did I need it!  My poor crayons have been sitting all brand new and unloved on their shelf since I got them- which was as soon as possible after their release, so for MONTHS now.  I'm pretty sure I heard them crying a couple of times.  Sure, I watched a couple of videos that people have done on using them and thought, "well doesn't THAT look fun"...and that was as far as I got.  Then I saw that Tim was going to be using them in the class and said to myself, "self, (heh) this is what you need to get you out of your non-crayon using slump.  go forth and actually DO the lessons and learn how to use these here crayons before they revolt and go live with someone who will love them."  
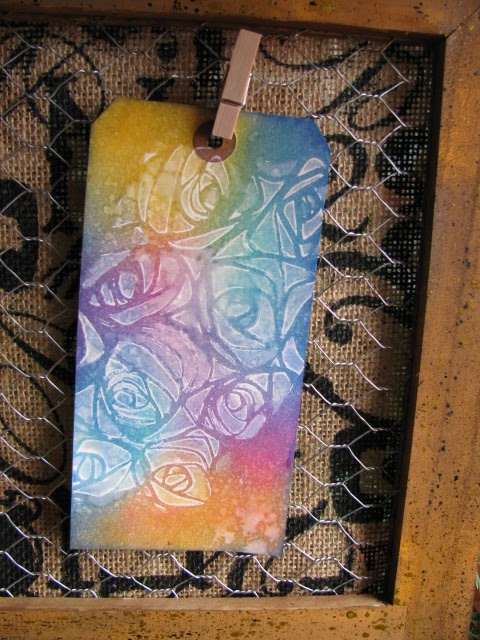
(have you seen the kid's book The Day the Crayons Quit?  It is very funny and there is a sequel The Day the Crayons Came Home.  So I knew that it was possible that my crayons would leave if I didn't get to it.)  The whole class is great, but just the day on the Distress Crayons was worth it!  Tim shows you a side by side comparison of the Distress Crayons and Gelatos (which you know I have...but I have actually used them a couple of times...) and really gets in depth about how to use the Distress Crayons and why he wanted them and what they do.  I will warn you now, they are quite addictive!  Plus Tim told us that Ranger will be making them in all of the Distress colors!! (right now there are 3 sets, but by the end of the year there will be 10) *swoon*  Here is a close up look at the individual projects. 

The frame was one I picked up at JoAnn and finally decided to finish.  Being a super genius, I put the burlap on first, then decided to paint.  "Becky J Horn, Super Genius.  I like the way that rolls out..."  If you have no idea what I'm talking about, go to YouTube and look up Wile E Coyote.  Go on, it's RIGHT THERE, I'll wait.  And yes, I do realize that this is telling my age, but well, there you go.  Ahh, Saturday morning cartoons...  Heh. 
The paint is Distress Walnut Stain and Fossilized Amber, then I used the splatter brush to add Tarnished Brass and Black Soot speckles.  And managed to not make a huge mess.  Go super genius! 
 
Thanks for stopping by, if you haven't taken the classes, go for it, they are well worth it- you get lifetime access to the videos and downloadable PDF's.  If you are taking the class, Yay!!!  :)  
Till next time!  Happy stamping!  (and inking, and painting, and texture pasteing...)


Tuesday, October 13, 2015

OMG...I drew a face!!

Whilst browsing on the Paper Artsy blog, I discovered that topic 19 is faces.  So immediately I said, "I can't draw a face, so I won't even try. Grump, grump, grump, mutter, mutter..."  However, I have no hesitations about looking at faces other people have drawn, so continuing to scroll down the posts, I discovered that the Lovely and Wonderful Leandra had included a video by Dina Wakley showing how to draw a face.  Thinking, "this is going to be a disaster, *grump grump mutter mutter*"  I pulled out my sadly neglected art journal (so VERY VERY neglected that it does not even need capitals as there are only two and a half pages that have anything on them-the only other page that had anything was ripped out in a fit of *YUCK* and has not been touched since, but I digress) with not very high hopes.  HOWEVER, Dina is a fantastic explainer and demonstrator at face making.  And so you see here a pretty human looking face. *after redrawing the eyes a few times to stop her looking like an extra from an alien movie*  I am well pleased with my first face attempt since about, oh, let's say age 10.  Mayhap I shall endeavor to create another face (or two or three) and finish them and perhaps *shudder* even write something on the page...Thanks Leandra for posting that video link, so I can say that this was inspired by you!  I'm thinking I need to draw some more faces...but Dina says to work on a background that is not too dark or heavy, so I need to make some backgrounds...onward to stencils and ink and paint!  WOO!

Here is the link to the PaperArtsy blog where you can learn all about faces!  

Tuesday, July 28, 2015

Onlinecardclasses Background Check: Inked Plaid

As promised (or threatened, whichever way you choose to take it...) here is the plaid one.  I used the Brushstrokes background stamp from SU! and two shades of gray inks- Archival Watering Can and Stayz-On Dove Gray.  Not digging the big gap where I failed to line up the stamp, and the lines faded out there a little too much but I figure I will cover that up with a sentiment or something later.  The inks on top are all Distress- Abandoned Coral (which is covering up the SU! Tangelo Twist that I originally put on there), Fossilized Amber, Cracked Pistachio (covering the original Twisted Citron-hey covering up the ink worked once, right?), and Mermaid Lagoon.  I'm thinking it would be fun to do some masking and inking right on the stamp combined with some masking and inking on the card stock too.  Might be a tad harder to line up, but wonky plaid is still plaid, right?  :)